Raspberry Pi Setup First Time Configuration Method :2 Windows 7
- Firstly, enable the WiFi adapter of the PC/Laptop and make sure it’s connected to a WiFi hotpspot. Open any Internet Browser and confirm internet access by opening any website.
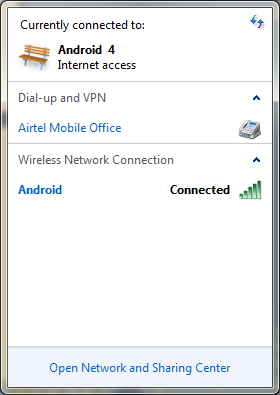
Note: I’m using my Android device (Nexus One) configured as a WiFi hotspot J
- Now, go to Network and Sharing Center (Network Settings in Win XP) and then head to the Change Adapter Settings page. As shown below, we’re connected to ‘Wireless Network Connection’ on ‘Android 4’. Do remember the ‘Local Area Connection’ to which we’ll eventually share this connection

- Now, right click the above Network → Properties and then select the Sharing tab

- From the drop down list, choose ‘Local Area Connection’ and enable both the checkboxes and hit OK. Once done, head back to the Adapter Settings page and you should now see the Shared info message on the Wireless Network Connection


- Now, right click ‘Local Area Connection’ → Properties and then select Internet Protocol Version 4 and then click the Properties Button

Once the properties tab pops up, make sure that the ‘Obtain IP address automatically’ checkbox is selected. If not, check it and hit OK

- Now, power up the Raspberry Pi (making sure that the Ras-Pi and the Laptop/PC are connected to each other through the LAN/Ethernet cable) and wait a minute or two while the Ras-Pi boots. Now, repeat step 5 (previous one) to make sure ‘Obtain IP Address Automatically’ is still checked.
- Open up command prompt using the hotkey Windows Key + R and then typing in cmd or simply keying in cmd in the start menu (Win 7)
- In the command prompt, key in ipconfig and scroll to the top of the info shown

Note the IPv4 address which is 169.254.39.68 in this example. Please make a note of what you see as this will be required further.
- Now, power off the Raspberry Pi and plug the Ras-Pi’s SD card into a card reader and connect it to the PC. Once the disk opens up, open the cmdline.txt file in any editor


You’d probably have an entry as ip=169.254.39.71 which we set up in our previous post
- Now, to this entry, append the IPv4 which we got earlier preceded by two colons as shown below:

where the first half is the static IP for Raspberry Pi (169.254.39.71) and the other half is the IP of the IPV4 or Ethernet Adapter (169.254.39.68) which we obtained earlier.
- Save this file and plug the SD card back into the Raspberry Pi. Power up the Raspberry Pi and wait for a min or two. Establishg a direct SSH connection with the Raspberry Pi as explained in the previous post.
- Now, to verify if our Ras-Pi is Internet-Connected, type in this command in the Shell (PuTTY terminal connected to the Ras-Pi)
and you should see response from the servers as shown below:

Voila!!! Your Raspberry Pi is now connected to the World Wide Web
- Going one step further, lets direct access the Raspberry Pi’s desktop and open up the midori browser. Verify Internet connectivity on the Ras-Pi by opening any website.
No comments:
Post a Comment